
Disclaimer: This is a personal blog, any views or opinions expressed in this blog are personal and belong solely to the blog author and do not represent those of people, institutions, or organizations that the author may or may not be associated with in a professional or personal capacity, unless explicitly stated. Any views or opinions are not intended to malign any religion, ethnic group, club, organization, company, or individual.
If you’ve been following along on how to Deploy WordPress on AWS Lightsail, you should now have a working WordPress site running on a server in AWS Lightsail. However, there are some tweaks you need to do in order for it to be ready for the public. Please keep in mind, if you’re running large Production workloads or expect large spikes in visitors to your site, Lightsail may not be the best option. You may want to check out our post on How to Create a Multi-Tier Auto-Scaling WordPress Site on Amazon Web Services. However, if you want to continue down the Lightsail path for a small blog, or a test site, read on!
Prerequisite
This is a continuation of our tutorial on how to Deploy WordPress on AWS Lightsail. Make sure you checked out that post before reading below.
Create a New Admin Account
Once you login to the WP Admin section of your WordPress site, it is best to create a new administrator level account with your own details, and to delete the default “user” account.

Note: A base Bitnami Stack does not have a mail server, so you won’t receive any emails from your site at this point in time. For example, you will not get an email when you create a new account, or will you be able to use the Forgot Password functionality since it relies on sending an email.
Remove the Bitnami Banner
A freshly installed Bitnami WordPress Stack has a Bitnami banner that displays on the bottom right of your webpage upon first installation. If you hover over the image and click on the “X”, it will disappear; however, it will come back upon reload/cleared cache.

To remove the banner, simply connect to your server via SSH and run the following command:
sudo /opt/bitnami/apps/wordpress/bnconfig --disable_banner 1It should take just a few seconds to run, and once it is complete you’ll see another line.

Now if you reload your site, you’ll see that the Bitnami banner no longer displays.
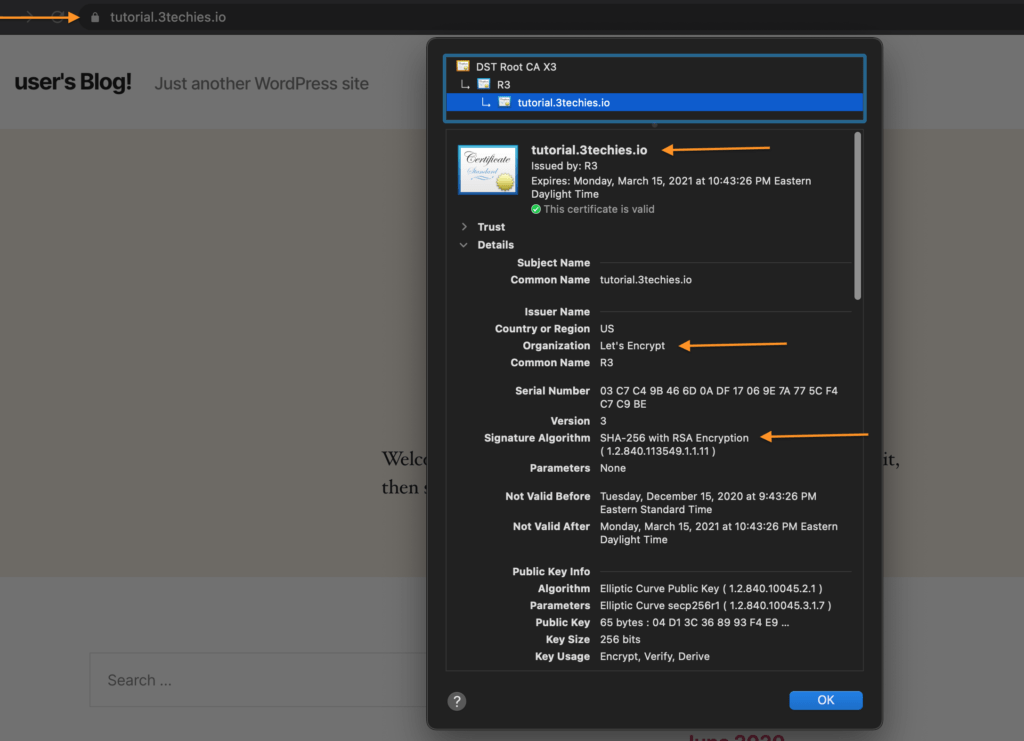
Install a Free Let’s Encrypt SSL Certificate
The great thing about Bitnami is how easy it is to set up and install a Free Let’s Encrypt SSL Certificate. Bitnami has the HTTPS Configuration Tool which will request the Let’s Encrypt certificate, sets up a cronjob to auto-renew the certificate so you don’t have to worry about an expiring certificate, and then configures Apache to use the new certificate.
In order to have this working properly, you’ll need to ensure that your DNS settings are set up properly and point to the IP address of the server that you are currently on. If you have any proxies, such as CloudFlare, now is the time to turn it off and allow proper time for DNS to propagate.
Once everything is set up, it’s as simple as running the following command and following the prompts.
sudo /opt/bitnami/bncert-toolIf the tool asks you to update, simply enter in “Y” for yes and hit the Enter key. Then re-run the above command after a few seconds.

For our example, we will only enter in tutorial.3techies.io; however, if this was your main site, you would enter in the following:
example.com, www.example.comType in “Y” for HTTP to HTTPS redirection as we want all users redirect to the secure version of our site.

Then type in “Y” so that the configuration tool can do its job.

Enter in the email address of an administrator for your site so they will receive notifications of any expiring certificates.
Once the tool is done you’ll see a “Success” message.

Now if you reload your website, you’ll see that you have a secure version of the site with a proper SSL certificate installed!
Adjust pHp Settings
The following settings are optional but I’ve found that they help out with day to day administration of the site, and also have some performance benefits. All of the below settings should be modified in this file:
/opt/bitnami/php/etc/php.iniEnsure that you have proper permissions to edit the file.
- Edit post_max_size to a size that allows you to upload files and/or transfer a site. I typically start with 2G
- Edit upload_max_filesize to a size that allows you to upload files and/or transfer a site. I set this to the same as post_max_size and also set this to 2G to begin with.
- Edit memory_limit which is the pHp memory limit. This should be based on all your processes on the server, and also the server size but I will stick with anything between 128 to 512M
- Edit max_execution_time which is the time a script can executive before it is terminated. I typically set this to 300 as many plugins and themes require this setting.
- Edit max_input_vars to a value that your theme/plugins require. I typically set this to 3000 to begin with.
- Enable the extension imagick
- Replace ‘;extension=imagick.so’ with ‘extension=imagick.so’
Enable .htaccess for WordPress
Bitnami can be tricky in that it doesn’t necessary store files/configurations where you would expect. This is done for security and obscurity reasons. For many WordPress plugins, you will need .htaccess to functional properly.
Edit the following file:
/opt/bitnami/apps/wordpress/conf/httpd-app.confReplace ‘AllowOverride None’ with ‘AllowOverride All’
Adjust Apache Settings
I also make the following changes to Apache in the following file:
/opt/bitnami/apache2/conf/httpd.conf- Disable Apache Pagespeed
- Comment out pagespeed
- Replace ‘Include conf/pagespeed.conf’ with ‘#Include conf/pagespeed.conf’
- Flush the Pagespeed cache by “touch”ing the following file:
- /opt/bitnami/apache2/var/cache/mod_pagespeed/cache.flush
- Enable mod_expires
- Uncomment
- Replace ‘#LoadModule expires_module modules/mod_expires.so’ with ‘LoadModule expires_module modules/mod_expires.so’
- Enable mod_ext_filter
- Uncomment
- Replace ‘#LoadModule ext_filter_module modules/mod_ext_filter.so’ with ‘LoadModule ext_filter_module modules/mod_ext_filter.so’
- Enable HTTP 2.0
- Uncomment
- Replace ‘#LoadModule http2_module modules/mod_http2.so’ with ‘LoadModule http2_module modules/mod_http2.so’
Ensure WordPress File Permissions are Correct
If you come across any permissions issues, running the following two commands may help out. Run each command after each other and you may need sudo rights to run them properly. The first command changes directory permissions and the second command changes file permissions.
find /opt/bitnami/apps/wordpress/htdocs -type d -print0 | xargs -0 chmod 775
find /opt/bitnami/apps/wordpress/htdocs -type f -print0 | xargs -0 chmod 664
Restart Bitnami
Run the following command to restart the full Bitnami stack and then reload your site to make sure everything functions as expected.
/opt/bitnami/ctlscript.sh restartInstall a Backup Solution
I recommend installing a plugin that will automate backups for you, and more importantly back up to an external solution. It’s painful to have a server get corrupt and have no backup of your full site.
Personally, I recommend Updraft Plus, and the Free version has great features to schedule backups and have them automatically uploaded to a Cloud storage solution such as S3. I use Updraft Plus on many sites that I manage.
Please note that Lightsail also has the ability to “Snapshot” a server daily. This takes a full backup of your server at a certain time everyday. Having more than one backup strategy is always a good thing. Use your best judgement for your use case.
Install a Security Solution
There are website threats and hacks that are released minute by minute. Restoring a compromised site is no easy task, and it can take hundreds of dollars and dozens of hours to get a site back online, let alone the damage done to your site’s reputation.
Take the time to install a security solution such as Wordfence or Sucuri. It gives you a little bit more protection and peace of mind, but keep in mind that no site is 100% invincible.
Enjoy your site!
Now that you’ve configured and added in some backup and security plugins to your WordPress install on AWS Lightsail, you are good to go!
If you start outgrowing AWS Lightsail and need a more robust solution, be sure to check out our Series on How to Create a Multi-Tier Auto-Scaling WordPress Site on Amazon Web Services.