
Disclaimer: This is a personal blog, any views or opinions expressed in this blog are personal and belong solely to the blog author and do not represent those of people, institutions, or organizations that the author may or may not be associated with in a professional or personal capacity, unless explicitly stated. Any views or opinions are not intended to malign any religion, ethnic group, club, organization, company, or individual.
This post is part of our series on how to Create a Multi-Tier Auto-Scaling WordPress Site on Amazon Web Services. If you haven’t checked out our previous posts, be sure to click the link above.
As a reminder, we’ll follow the AWS Reference architecture as close as possible; however, we will try to use Free Tier resources whenever available. For this tutorial, we are going to create a new Virtual Private Cloud (VPC) on AWS specific to our use case of scalable WordPress. Keep in mind that each AWS Account comes with a default VPC that you can begin using right away; however, you may have a need to create your own or you just want to know how it all works together.
Scalability does come with some drawbacks with regard to keeping themes/plugins up to date; however, it all depends on your goal and what you need for your site. The way you’ve traditionally managed WordPress will be different with this architecture and that needs to be taken into account long-term.
Please note that we are going to put the whole WordPress installation on EFS which does have some latency and performance concerns. We will try to overcome this with caching and CDN; however, if that’s not performant enough for your use case, you may want to only put the “uploads” directory on EFS and then have a process to update the base AMI going forward.
Prerequisite: Basic Knowledge of VPCs and SGs
If you took a look at the AWS Reference architecture, you’ll see that we are going to create 1 VPC, with at least 3 Subnets (Public Subnet, Application Layer Subnet, and a Data Layer Subnet). For more information on VPCs and Security Groups, check out this page in the AWS Documentation.
Create a new Virtual Private Cloud (VPC)
The very first thing you’re going to want to do is login to your AWS Management Console and then go to the VPC Service.

Once there, you’ll see that there is a VPC Wizard, and you can see the counts of your default VPC “resources”; however, as mentioned before, we’ll be going the manual route for this exercise.

Click on “VPCs” to see a listing of your existing VPCs or click on “Your VPCs” on the left side bar to take you to the same location. Now you can click on “Create VPC” in the top right.

Next you’ll fill in some values to create your VPC. Fill in the following:
- Name tag: A friendly name for your VPC
- IPv4 CIDR block: This is the CIDR block range for the VPC. The smallest you can use is /28 and the largest is /16. My personal preference is to use 10.0.0.0/16
- Tenancy: Default, which means you’ll be on shared hardware. You can select dedicated but it will incur additional charges.
- Tags: Add any additional tags that make it easy for you to manage your project.

Once all the information is input, click on “Create VPC”. When you click that button, a lot more happens behind the scenes which is beyond the scope of this post: feel free to check out this page for more information.
If you explore a bit on the VPC page, you’ll notice that a default route table was created, as well as network ACL. Additionally, you’ll see a new Security Group tied to the new VPC.
Important: A VPC spans all of the Availability Zones in a specific Region.
At this point, you can also click on the VPC, and Enable both DNS Resolution and DNS Hostnames for those in the public subnets we will create.


Quick Information about Subnets
The CIDR block we specify for our subnets are a subset of the VPC CIDR block. Depending on your use case/architecture, you can add one more more subnets in each Availability Zone; however, subnets cannot span different Availability Zones.
It is also important to note that AWS reserves the first four IP addresses, and the last IP address in each subnet CIDR block for its own internal purposes. Read more about it at this link.
Create Subnets for your VPC
Now that our VPC is created, we can begin creating our subnets. It is a personal preference on what ranges you want to use but for ease of use, I use CIDR ranges that correspond to the Availability Zone and I create the same number of subnets as there are Availability Zones in a Region.
For example, the us-east-1 Region has 6 Availability Zones so I’ll create the subnets in the following manner:
| Subnet Name | Region | Availability Zone | CIDER | Purpose |
| 3T Subnet 1a | us-east-1 | us-east-1a | 10.0.1.0/24 | Public |
| 3T Subnet 1b | us-east-1 | us-east-1b | 10.0.2.0/24 | Public |
| 3T Subnet 1c | us-east-1 | us-east-1c | 10.0.3.0/24 | Application |
| 3T Subnet 1d | us-east-1 | us-east-1d | 10.0.4.0/24 | Application |
| 3T Subnet 1e | us-east-1 | us-east-1e | 10.0.5.0/24 | Data |
| 3T Subnet 1f | us-east-1 | us-east-1f | 10.0.6.0/24 | Data |
The table above makes it easy for us to create our Subnets. In the VPC Dashboard, simply click on “Subnets” in the left side bar and then click on “Create subnet” in the top right.
Note: This is a simplified set up. Ideally, we would have multiple subnets in each Availability Zone. Additionally, with the AWS Reference architecture, you would need a NAT Gateway to have your Application layer reach out to the Internet through the NAT Gateway for additional security. We could avoid this by putting WordPress instances in our Public subnet or having the Application Subnets reach out to the Internet; however, this is not as secure and not preferred. If you don’t want the cost of running the NAT Gateway managed service, you can always create a micro instance that serves as a NAT Gateway. To save on costs, I went the route of configuring a t2.micro instance as a NAT Gateway. Following the directions in the link above will have you up and running in about 10 minutes.

Make sure that you create the Subnet for the VPC that we just created: you’ll need to select it in the drop down.

For the subnet settings, simply copy and paste from the table earlier, and add in details for all 6 subnets. You can do it all in one shot to make it easy.

Once you click on “Create subnet”, you’ll see that they are all created to your specifications!

Important Note: Although we have our subnets created, none of them are public facing and none will auto-assign public IPs to resources created within them. We’ll take care of that next.
Create an Internet Gateway
So what is an Internet Gateway? Simply put, it’s a component that allows our VPC to connect out to the Internet. There is no charge to use an Internet Gateway and you can read more about them at this link.
On the left sidebar, click on “Internet Gateways” and then click on “Create internet gateway”.

All we have to do here is give it a name, and then attach it to our VPC once it is already created, check out the screenshot to see this part a bit easier. It’ll be under the “Actions” menu.


Once attached, you’ll see the State change to “Attached”.

Note: Even though we have an Internet Gateway attached to our VPC, it’s not doing anything…yet! We need to configure our route table to point our public subnets through the Internet Gateway. Additionally, we’ll need to ensure that our Security Groups that we use for our resources allow traffic to flow through the Internets on the ports we specify.
Route Public Subnets through Internet Gateway
Earlier in our post, we mentioned that creating a VPC does more magic behind the scenes and this includes creating a default route table. For our purposes, we are going to create a new route table that our public subnets will use.
In the left sidebar, click “Route Tables” and then click on “Create route table” in the top left.

Give it a friendly name and attach it to the VPC we created, then click on “Create”.

Now select your new Route Table and click on “Routes” in the tabbed Menu bar and click on “Edit Routes”.

Added a “New Route” with destination 0.0.0.0/0 and select “Internet Gateway” as the Target, and then specify the Internet Gateway that you created. Then “Save routes”.

Lastly, we need to click on the “Subnet Associates” tab and attached our two public subnets from the table above to this Route Table. This will allow resources in these subnets to reach out to the internet.
Note: The other subnets are using the default route table created at VPC creation which is private by default.


Assign IPs for your Public Subnets
One detail that is sometimes missed is that you need your resources in your Public subnets to have a public IP address assigned. This is a quick setting that you can find by going back to your Subnets Dashboard.
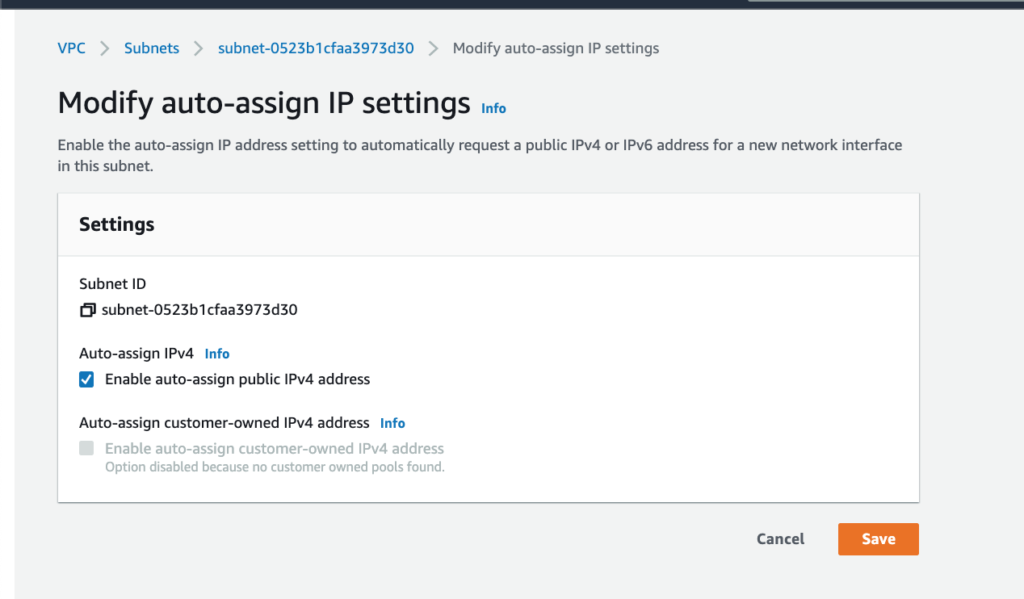
Click on your Public subnet and then go to “Actions” and then “Modify auto-assign IP settings”.
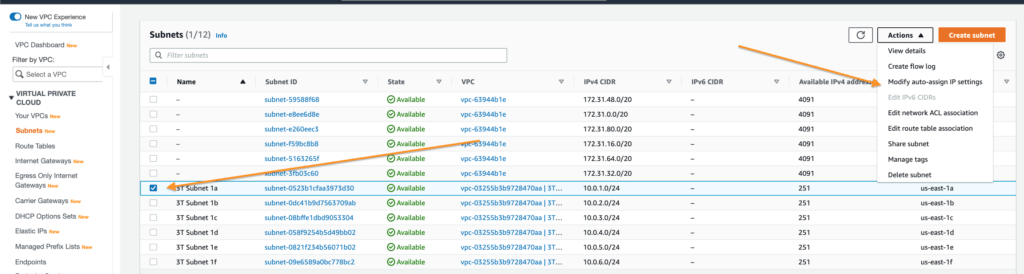
Then select “Enable auto-assign public IPv4 address” and click on “Save”. Perform this action for any of your Public subnets.
At this point, we are all set with our VPC and Subnets! The two subnets tied to this route table can reach out to the internet directly, and resources in these subnets will get their own public IP address. If we need resources in the other subnets to reach out to the internet, we can do so with a NAT Gateway. Note that NAT Gateways do have additional charges both for time they are running, as well as per GB transferred through the NAT Gateway. As mentioned earlier in this post, you could always create your own t2.micro instance to run as a NAT Gateway; however, this does bring in a point of failure and is not as highly available or scalable as the AWS Managed NAT Gateway Service.