
Disclaimer: This is a personal blog, any views or opinions expressed in this blog are personal and belong solely to the blog author and do not represent those of people, institutions, or organizations that the author may or may not be associated with in a professional or personal capacity, unless explicitly stated. Any views or opinions are not intended to malign any religion, ethnic group, club, organization, company, or individual.
Fair warning, this is going to be a lengthy post! We need to create our base server that we’ll use as our AMI for our Auto-Scaling Group. This means we’ll have to launch an EC2 Instance, add in our EFS Mount with CacheFS, install OpenLiteSpeed which is our preferred app server, install WordPress and configure it to use RDS and ElastiCache. As a bonus, we’ll also use S3 to offload our media.
This post is part of our series on how to Create a Multi-Tier Auto-Scaling WordPress Site on Amazon Web Services. If you haven’t checked out our previous posts, be sure to click the link above.
As a reminder, we’ll follow the AWS Reference architecture as close as possible; however, we will try to use Free Tier resources whenever available. For this tutorial, we are going to create our Master WordPress Server that will be used to create an AMI to use for auto-scaling out our WordPress installation on AWS.
Scalability does come with some drawbacks with regard to keeping themes/plugins up to date; however, it all depends on your goal and what you need for your site. The way you’ve traditionally managed WordPress will be different with this architecture and that needs to be taken into account long-term.
Please note that we are going to put the whole WordPress installation on EFS which does have some latency and performance concerns. We will try to overcome this with caching and CDN; however, if that’s not performant enough for your use case, you may want to only put the “uploads” directory on EFS and then have a process to update the base AMI going forward.
Prerequisite: AWS Reference Architecture and Previous Posts
As mentioned above, please ensure that you check out the AWS Reference architecture as well as our previous posts.
Create your Base EC2 Instance
Our first step is going to be to create a new EC2 Instance to act as your Master WordPress Server and have it reside on one of our web/app subnets.
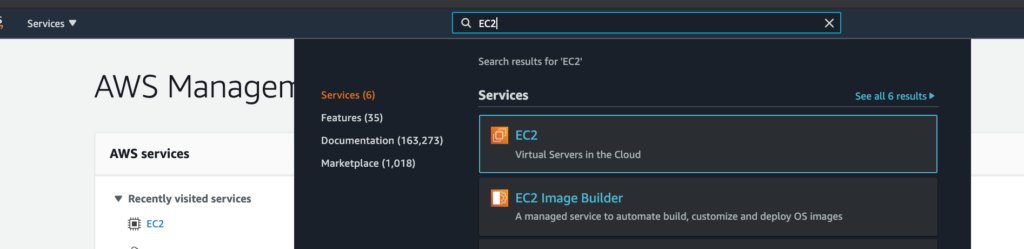
Login to your AWS Management Console and then go to the “EC2” service.
Then click on “Instances” to get to the Instances Dashboard.

Click on “Launch instance” in the top right.

Select a Free Tier AMI
Once there, select a Free Tier eligible AMI. I’m familiar with Ubuntu, so I’ll select that image.

Select an Instance Type
I’m going to start with a t2.micro instance and if I come across any issues, I can always change the instance type later on.

Click on “Next: Configure instance details”.
Configure your instance to use your VPC and Public Subnet
Make sure to select the VPC you created.
For ease of use for the time being, feel free to create this particular server in a Public Subnet since we’ll create the AMI and then terminate the instance. Creating the server in the Public Subnet will allow us to access the OpenLiteSpeed Admin Console easily where we will perform some configuration tasks. Once we have the AMI created, we’ll be sure to launch instances in our web/app subnet for security purposes.
**If you create the server in in our web/app subnet right now, you’ll need to have an ELB Ready with Target Groups as we’ll need to access the OpenLiteSpeed Admin Console on port 7080 which can get tricky.
Note: We could attach our EFS File System here; however, we want to ensure we use cachefilesd to better performance!

Click on “Next: Add Storage”.
Configure Storage
I’ll change the size to 30GB to stay in the Free Tier

Add Tags to your Instance
Then you can add “Tags” in the next step if you’d like, and then continue to “Next: Configure Security Group”

Select our Web/App Security Group and NAT
Select the the Security Group that is open to the public for the time being (ELB/Bastion).
***If you created the server in a Private Subnet , then you’ll need to add in your NAT Security Group.

Launch your Instance and select SSH Keys
Now click on “Review and Launch”! You may see warnings on Free Tier eligibility as well as your Security Group being open to the world.
If you have an SSH Key Pair already created and have access to the key, go ahead and use that or create a new one. Ensure you download the key at this point in time as you won’t see it again!

Go ahead and “Launch Instances”.
Name your Instance for easy identification

I like to name my instances for easy identification. I’ll call this instance “3T – Web Master”.

Update Your Server
Login to your new server through your Bastion Host. Keep in mind that you’ll need to use SSH Agent, and we went over all those details in our Bastion Host Post. Hint: SSH to your Bastion host first with the command ssh -A ubuntu@bastionhost, once you’re logged into your Bastion Host, then ssh to your new server with ssh ubuntu@InstancePrivateIP
Ensure your server is updated with the following two commands. Agree to prompts as needed or add the “-y” flag.
$ sudo apt-get update
$ sudo apt-get dist-upgrade
Go ahead and reboot the server for good measure as well!
Install OpenLiteSpeed
This is where we stray from the AWS Reference guide a bit. Instead of using vanilla Apache, we are going to use OpenLiteSpeed Server.
Add the necessary repository for our installation:
wget -O - http://rpms.litespeedtech.com/debian/enable_lst_debain_repo.sh | bashThen install OpenLiteSpeed:
sudo apt install openlitespeedStart the server and then check the status:
systemctl start lsws
systemctl status lsws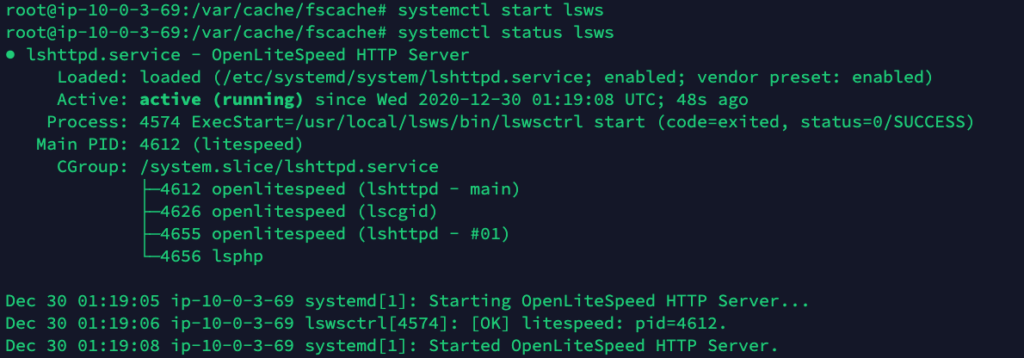
At this point, we have OpenLiteSpeed installed in a base configuration.
Important Details: Web Server is currently configured to port 8088, and the Admin console is configured to Port 7080.
Set the Admin Password for the Console
sudo /usr/local/lsws/admin/misc/admpass.shConfigure Server
WordPress Packages
Install some packages that we know WordPress will need:
sudo apt install lsphp74-common lsphp74-curl lsphp74-imap lsphp74-json lsphp74-mysql lsphp74-opcache lsphp74-imagick lsphp74-memcached lsphp74-redis
Login to the Admin Console
This is where it is easier to have the server in a Public Subnet with direct access in a browser. You will go to https://SERVER_IP:7080 and login with the admin/password set with this command:
**Keep in mind, if you created this server in your private subnet, you’ll need additional configurations to be able to access.
/usr/local/lsws/admin/misc/admpass.shUse PHP 7.4
Navigate to Server Configuration -> External App -> Click the small edit button on the right side.

Name: Change to lsphp74
Address: Change to uds://tmp/lshttpd/lsphp74.sock
Command: Change to $SERVER_ROOT/lsphp74/bin/lsphp


***Make sure to scroll back to the top and click the Save Icon. Click on the Restart Button next.

sudo ln -sf /usr/local/lsws/lsphp74/bin/lsphp /usr/local/lsws/fcgi-bin/lsphp5Virtual Hosts Configuration
Navigate to “Virtual Hosts” and then click on the View button next to “Example”.
Click on General and then the Edit Button.
Change the Document Root to $VH_ROOT/html/wordpress which will be our EFS File System (more on this later in the post). Make sure to hit the Save Button.

Now go to the “Index files” section and click on “Edit”.
Add in index.php to the beginning.

Now to the “Rewrite” tab and “Enable Rewrite” and enable “Auto load from .htaccess”

Gracefully restart LSWS.
Change to Default Port 80
Click on “Listeners” in the left side bar and then click on Edit.

Click “Save” and then restart.
Delete OpenLiteSpeed Example Context
Under Virtual Host Example, click on “Context” and go ahead and delete every single one.


Set up OpenLiteSpeed for CORS
In the same Context section, perform the following:
- Click the Add button
- Choose Static type, hit the “Forward” button in the top right to go to Next
- URI = / (You can change this if you want to)
- Accessible = Yes
- Header Operations
- Access-Control-Allow-Origin *
- Access-Control-Allow-Methods GET, POST, OPTIONS, DELETE
- Click the Save button
- Do a graceful restart

Edit php.ini Values
OpenLiteSpeed installs with a default php.ini
Navigate to the correct php.ini file location and edit parameters as you see fit. For example, I increase the post_max and max_upload values to increase upload size. Depending on your needs, you may also want to increase the php memory settings.
sudo vi /usr/local/lsws/lsphp74/etc/php/7.4/litespeed/php.iniMount your EFS File System
Install NFS Common Package for Ubuntu
Since we are using Ubuntu, we are going to install the nfs-common package with the following command:
sudo apt-get install nfs-common -yInstall CacheFileSD Package for Ubuntu
We are also going to install cachefilesd
sudo apt-get install cachefilesd -yConfigure CacheFileSD
With a user with proper permissions, edit /etc/default/cachefilesd and uncomment the line RUN=yes (remove the #).
sudo vi /etc/default/cachefilesd
Start CacheFileSD
Then start the service with the following command:
sudo /etc/init.d/cachefilesd start
You can also check the status of the service with the following:
sudo service cachefilesd status
Determine File System DNS
Next, you’ll need to determine your File System DNS name; the nomenclature is as follows:
file-system-id.efs.aws-region.amazonaws.comTherefore, our DNS Name would be
fs-c482de31.efs.us-east-1.amazonaws.comMount File System Command
Next, we are going to mount the EFS file system to a directory we create, and ensure that it uses cachefiles.
Important: the fsc option is what tells the system to use cachefilesd. This is not noted in the AWS Documentation.
Note: We are mounting in a slightly different directory from when we tested this on our Bastion Host.
cd #takes us to our home directory
sudo mkdir /usr/local/lsws/Example/html/wordpress
sudo mount -t nfs4 -o nfsvers=4.1,rsize=1048576,wsize=1048576,hard,timeo=600,retrans=2,fsc fs-c482de31.efs.us-east-1.amazonaws.com:/ /usr/local/lsws/Example/html/wordpress
sudo service cachefilesd restart  #to ensure that cachefilesd knows about our new mount
Note: If you have issues with using the DNS name to mount your File system, ensure your VPC has DNS Hostnames and DNS Resolution Enabled. It may take a few minutes to reflect.

Verify that our EFS Mount is working with CacheFileSD
Navigate to the caching directory which is typically /var/cache/fscache, and then list the files. If you see two directories, you are all set.
You can also check stats with the following command:
cat /proc/fs/fscache/statsMount File System On Startup
To ensure that our file system is mounted on start-up, we’ll edit the fstab file.
sudo vi /etc/fstab
fs-c482de31.efs.us-east-1.amazonaws.com:/ /usr/local/lsws/Example/html/wordpress nfs4 nfsvers=4.1,rsize=1048576,wsize=1048576,hard,timeo=600,retrans=2,fsc,_netdev 0 0
Reboot Server and Ensure Mount is still Present
Go ahead and reboot your server and then run df -h to make sure that your mount is still present.
Install WordPress
We are near the end of creating our base server and that requires installing WordPress.
First, we’ll download the latest version of WordPress and untar it into our /tmp directory with the following commands:
Download and Untar WordPress
cd /tmp
curl -O https://wordpress.org/latest.tar.gz
tar xzvf latest.tar.gz
Setup .htaccess and upgrade folder
Next, we’ll ensure that we have a .htaccess file created so that we can put in any of our Rewrite rules, etc, and also create an upgrade folder to make the process easier in the future.
touch /tmp/wordpress/.htaccess
mkdir /tmp/wordpress/wp-content/upgrade
Copy files to our EFS Directory
Next, we’ll copy the WordPress files to our EFS directory which OpenLiteSpeed Server uses. This is how we keep all our servers in sync in the future.
sudo cp -a /tmp/wordpress/. /usr/local/lsws/Example/html/wordpress
sudo chown -R nobody:nogroup /usr/local/lsws/Example/html/wordpress
Ensure we have the correct permissions on our WordPress files and directories
sudo find /usr/local/lsws/Example/html/wordpress/ -type d -exec chmod 750 {} \;
sudo find /usr/local/lsws/Example/html/wordpress/ -type f -exec chmod 640 {} \;
Complete Install via Browser
Now, all we need to do is open up the server IP (if in Public Subnet), or ELB address (If you went the Private Route) to finish the WordPress installation. This is where we will input our AWS RDS details and ensure everything works as expected.

If you’re able to successfully connect, you’ll be taken to the next screen:

Once you click on “Install WordPress”, you’ll be all set and you can login with the Username and Password that you input.
I know this is already a long post, and we could technically set up our AMI now and be all set…but we’re going to take it a few steps further…bear with me.
Install and Configure LiteSpeed Cache
We are going to use LiteSpeed Cache to connect to our ElastiCache cluster, CDN, as well as other basic Cache settings. All of these elements will help speed up our site and potentially mitigate some of the performance impact from using EFS.
Activate LiteSpeed Cache
Once you login to your WordPress backend, go to “Plugins” -> “Add New” and search for “LiteSpeed Cache”. Install and then “Activate” the plugin.

Once Activated, you’ll see a new section on the left sidebar:

Enable Cache and Configure ElastiCache
Navigate to the “Cache” section and make sure that “Enable Cache” is set to “On”. Click on “Save” in the top right.

In the same “Cache” page, now click on the tab for “Object” cache. We already installed the packages for both Memcached and Redis so we should be set there. Switch “Object” cache to “On”, Method to “Redis”, and then type in your Redis Endpoint from ElastiCache; port is default at 6379.
Finally, click on “Save Changes” and you should see everything in an “Enabled” and “Passed” status.

Now our site is configured to use our ElastiCache cluster!
Install and Configure WP Offload Media by Delicious Brains
We are going to use WP Offload Media by Delicious Brains to upload our media to S3 directly. We also configure CloudFront to speed up our site. This is another tactic that will help speed up our site and potentially mitigate some of the performance impact from using EFS.
Activate WP Offload Media
Once you login to your WordPress backend, go to “Plugins” -> “Add New” and search for “WP Offload Media“. Install and then “Activate” the plugin.

Create an IAM User with S3 Access
Navigate to the IAM Service and then click on Create User, and give it a friendly user name and select “Programmatic access”.

For the time being, select existing Policy and attach the policy for full S3 access. Later, we’ll want to lock this down to a specific bucket.

Next, create the user and note down the Access ID and Secret. Go ahead and download the CSV for safe keeping as well.

Now go ahead and add the following block to your wp-config.php file. Hint, you can login to the server through your Bastion Host.
define( 'AS3CF_SETTINGS', serialize( array(
    'provider' => 'aws',
    'access-key-id' => '********************',
    'secret-access-key' => '**************************************',
) ) );
Create S3 Bucket
Now you can continue by going to the Offload Media Lite settings in the Admin Console in your browser.

We’ll use the Guide to create a new bucket for us.


After you click on “Create New Bucket”, the bucket will be created in your account and your net new media uploads will go directly to your S3 Bucket and the plugin will rewrite URLs to serve the assets from S3 instead of your server directly. However, we’ll take this a step further and configure a friendly URL and to use CloudFront as our Content Delivery Network (CDN).

Configure CloudFront for Media
Now we’re going to use that S3 bucket as the Origin for our CDN on CloudFront. Please note that this is only a CDN for the files that are going to be uploaded to the WordPress Media Library. We’ll create a separate CDN for our css and javascript files, still within OpenLiteSpeed.
Step 1 is to create an SSL certificate on AWS for our CDN. If you followed our guide, this was one of the first things that we did for our domain and we created a wildcard certificate to make things easier for the future, which is now 🙂
Since we are going to use CloudFront, we can Block Public Access to our S3 Bucket for best practices later on.
Create CloudFront Origin Access Identity
For now, navigate to the CloudFront Service and then click on “Origin Access Identify” in the left sidebar. Then click on “Create OAI”.

Add a Comment and click on “Create”.

This created our OAI which we’ll use in the next step.
CloudFront Distribution
Click on “Distributions” in the left sidebar and then click on “Create distribution”.

Our delivery method will be “Web”, so click “Get started” under that method.

For the Origin Domain name, click on the text box and you’ll be able to then see a drop down of the S3 bucket we created. Next, change “Restrict Bucket Access” to “Yes”, “Origin Access Identity” to “Use an Existing Identity” and select the OAI we created just before, “Grant Read Permissions on Bucket” to “Yes, Update Bucket Policy”.

Default Cache Behavior
I like to change the following values, but the default settings will work in many cases.
- Allowed HTTP Methods: Change to “GET, HEAD, OPTIONS, PUT, POST, PATCH, DELETE”
- Cached HTTP Methods: Click the box next to “Options”
- Cache and origin request settings: Change to “Use legacy cache settings”
- Cache Based on Selected Request Headers: Change to “Whitelist”
- Whitelist the following:
- Access-Control-Allow-Origin
- Access-Control-Request-Headers
- Access-Control-Request-Method
- Origin
- **We added these to prevent CORS errors in our browsers.

Other Cache settings can be left as is:

Distribution Settings
This section is important as it is where we will specify the friendly name for our DNS and also select the certificate we created in ACM.
Price Class: We use All Edge Locations as we expect a broad worldwide audience, but you can narrow down where you want to cache your content. Select what makes sense for your use case.
Alternate Domain Names (CNAMEs): Enter in the subdomains you will use for your CDN. You can enter one on each line if you are going to use multiple CNAMEs.
Custom SSL Certificate: Select the certificate we created earlier in ACM. You will need to ensure that the certificate is a wildcard certificate or contains the subdomain name you put in the Alternate Domain Names section.

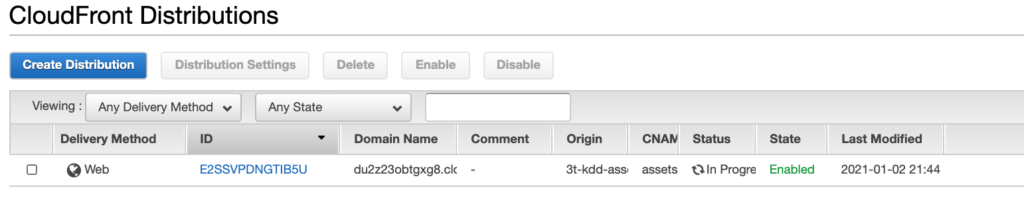
Now click on “Create Distribution” in the bottom right and when you go back to the Dashboard, you’ll see that the Distribution is being created.
Configure DNS for your CloudFront Distribution
You’ll see in the screenshot in the above section that you were provided a “Domain Name”. In our example, we have du2z23obtgxg8.cloudfront.net.
Thus, we’ll need to go to our DNS provider and create a CNAME record for “assets” that points to “du2z23obtgxg8.cloudfront.net”. Simply perform the same with your DNS provider for the CNAME you provided and the CloudFront URL that you were given for your distribution.

Configure WP Offload Media to use Amazon CloudFront
Once you see that your CloudFront Distribution Status is fully “Deployed”, we can proceed with the next steps. Please note that it can take upwards of an hour for the Distribution to be fully Deployed.

Scroll down to the “Delivery” section in WP Offload Media and change the Provider from S3 to Amazon CloudFront.


Also turn the Custom Domain (CNAME) to “On” and type in your subdomain that you’d like to use. If you’re not using a friendly DNS name, then just enter in our CloudFront Distribution URL.

Make sure to “Save changes”
Now for any **NEW** Media that you upload, you’ll notice that the URL is changed to your friendly URL and it’ll be served from your CDN! Test it out by uploading a new file to our Media Library.

Important Note: Because we are using the Free/Lite version of the WP Offload Media plugin, it only handles new media that we upload. If you have an existing site with lots of media that you’ll need to transfer, you’ll have to purchase the Premium version of the plugin which I highly recommend. There are other free options such as S3 Upload by Human Made; however, you need to be familiar with the CLI. Use whatever works for you!
Block Public Access to S3
Navigate to S3 and the bucket that we created earlier with WP Offload Media. Click on the bucket name.

Go to the Permissions Tab and then the Bucket Policy Section. You should see an element that refers to our CloudFront OAI. If you don’t see something similar to the following, go back to the CloudFront distribution’s Origin, and select “Yes, Update Bucket Policy” again before saving it. Reference earlier in the post as this is very important.

Now we are safe to move to the next steps where we will use the plugin to Block Public Access to the S3 Bucket.
Click on “Change” next to the bucket name (even though we are not going to change the bucket).

Now click on “Save Bucket Setting” even though we didn’t actually change anything.

This presents us with the screen where we can change the access settings to our S3 Bucket.
Select the checkbox next to “I have set up the required Origin Access Identity and bucket policy” and then click on the button “Enable Block All Public Access”.

You will now see that “Block All Public Access” is enabled which is the result we want!

At this point, go ahead and do a test upload to the Media Library and make sure everything is working as expected.
Note: If you delete from your Media Library, it will also delete from S3. It will take time to delete from CloudFront, or you can manually invalidate distribution objects.
S3 Offload and our CloudFront Distribution for Media is now complete. Congrats!
Create a CloudFront Distribution Specific to JS and CSS
Since WP Offload Media is handling the CDN for our media uploads, we still need a CDN for our javascript and stylesheet files. If you purchase the “Gold” level of WP Offload Media, they have a great add-on that will perform this for us; however, we’ll go the separate manual route for now.
Let’s go back to the CloudFront Service page and create a brand new Web distribution.
We are going to use settings similar to the above section; however, the following are some changes that you’ll need to make.
Origin: Type in your domain name here. (Yes, you could use an ELB, or another S3 bucket, but for simplicity sake, we’ll use our domain name)
Origin Protocol Policy: Match Viewer

- Allowed HTTP Methods: Change to “GET, HEAD, OPTIONS, PUT, POST, PATCH, DELETE”
- Cached HTTP Methods: Click the box next to “Options”
- Cache and origin request settings: Change to “Use legacy cache settings”
- Cache Based on Selected Request Headers: Change to “Whitelist”
- Whitelist the following:
- Access-Control-Allow-Origin
- Access-Control-Request-Headers
- Access-Control-Request-Method
- Origin
- Host
- **We added these to prevent CORS errors in our browsers.
- Query String Forwarding and Caching: Forward all, cache based on all

Distribution Settings
Add multiple CNAMEs if possible (this will improve page load times, we won’t get into the reason why here), and then use the same wildcard certificate from ACM that we did previously.
I like to use the following Alternate Domain Names:
- js.domain.com
- css.domain.com
- cdn.domain.com
- cdn2.domain.com
- static.domain.com

Click on “Create distribution” and once you have the CloudFront URL, go ahead and create the CNAME Records with your DNS Provider.
Configure CDN on LiteSpeed Cache
Navigate to the CDN Section in LiteSpeed Cache and then enable “Use CDN Mapping”
Add different URLs for each type of asset, and then limit the extensions on the “File types” column. See the screenshot below for guidance.

Note that we are not including Images since they’ll be served by the CDN created with WP Offload Media.
Next, click on Save Changes, and you’ll be all set!
Create an AMI
Let’s review everything we did in this tutorial.
- Launched an EC2 Instance
- Installed OpenLiteSpeed Server
- Mounted our EFS File System
- CacheFS Installation and configuration
- Installed WordPress
- LiteSpeed Cache on our WordPress Site
- Offloaded Media to S3 with WP Offload Media, while using a CDN
- Created a separate CDN for our static assets
That is quite a bit just to get our server ready to create an Amazing Machine Image which will be used to auto-scale our WordPress Installation.
Check out our next post on how to Create an Amazing Machine Image (AMI).