
Disclaimer: This is a personal blog, any views or opinions expressed in this blog are personal and belong solely to the blog author and do not represent those of people, institutions, or organizations that the author may or may not be associated with in a professional or personal capacity, unless explicitly stated. Any views or opinions are not intended to malign any religion, ethnic group, club, organization, company, or individual.
This post is part of our series on how to Create a Multi-Tier Auto-Scaling WordPress Site on Amazon Web Services. If you haven’t checked out our previous posts, be sure to click the link above.
As a reminder, we’ll follow the AWS Reference architecture as close as possible; however, we will try to use Free Tier resources whenever available. For this tutorial, we are going to create an Amazon Machine Image (AMI) that will be the base image we use to auto-scale WordPress.
Scalability does come with some drawbacks with regard to keeping themes/plugins up to date; however, it all depends on your goal and what you need for your site. The way you’ve traditionally managed WordPress will be different with this architecture and that needs to be taken into account long-term.
Please note that we are going to put the whole WordPress installation on EFS which does have some latency and performance concerns. We will try to overcome this with caching and CDN; however, if that’s not performant enough for your use case, you may want to only put the “uploads” directory on EFS and then have a process to update the base AMI going forward.
Prerequisite: AWS Reference Architecture and Previous Posts
As mentioned above, please ensure that you check out the AWS Reference architecture as well as our previous posts.
Additionally, you’ll need to have a fully configured server before we proceed.
Click here for our article on how to set up our WordPress server.
What is an AMI?
An AMI, or Amazon Machine Image, is essentially the information/blueprint needed to launch an instance. Even when we were selecting Ubuntu for our EC2 instances in earlier posts, we were really selecting an AMI.
Why is creating an AMI Important?
The AMI is the base image that is going to be used to scale our WordPress site up and down. Amazon’s launch template needs to know what “blueprint” to use when spinning up a new server. If we didn’t configure an AMI with WordPress the way we want it, and the EFS file system there, we would essentially get a barebones Linux server with no WordPress site. The AMI and auto-scaling allows us to duplicate this server whenever we need more compute power.
Create your Private AMI
At this point, creating an AMI is quick and easy. Navigate to the EC2 Dashboard where you have your WordPress instance running successfully. You can create an AMI from a running instance, but my personal preference is to first stop the instance which is what we’ll do.

If you opt to create the AMI while the server is running, it will temporarily go down while the AMI is being created, but will come back online automatically.
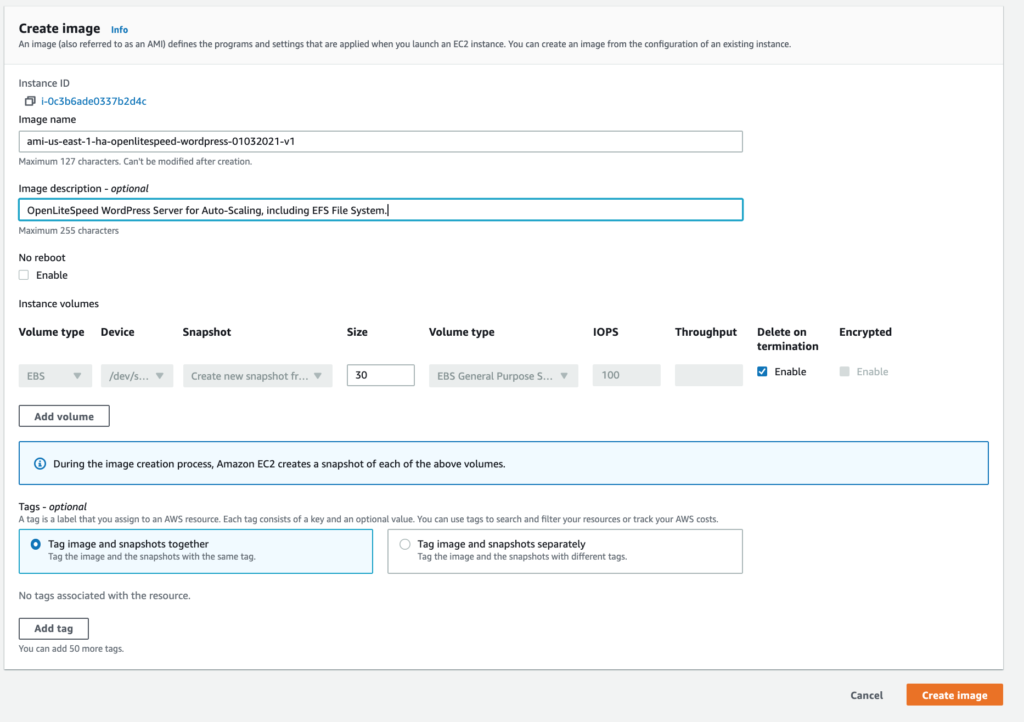
Once your instance is stopped, select it again, and then go to “Actions” -> “Images and templates” -> “Create image”

Give the image a name that makes it easy to identify and understand. I like to include the region, purpose, and date for easy identification. Then go ahead and “Create image”.
It will take a few minutes for everything to complete, and you’ll see the status change from “pending” to “available”.


With our AMI all set, it’s time to set up our ELB and Auto-Scaling!