
Disclaimer: This is a personal blog, any views or opinions expressed in this blog are personal and belong solely to the blog author and do not represent those of people, institutions, or organizations that the author may or may not be associated with in a professional or personal capacity, unless explicitly stated. Any views or opinions are not intended to malign any religion, ethnic group, club, organization, company, or individual.
This post is part of our series on how to Create a Multi-Tier Auto-Scaling WordPress Site on Amazon Web Services. If you haven’t checked out our previous posts, be sure to click the link above.
As a reminder, we’ll follow the AWS Reference architecture as close as possible; however, we will try to use Free Tier resources whenever available. For this tutorial, we are going to set up our Elastic Load Balancer (ELB) and also set up Auto-Scaling for our WordPress site.
Scalability does come with some drawbacks with regard to keeping themes/plugins up to date; however, it all depends on your goal and what you need for your site. The way you’ve traditionally managed WordPress will be different with this architecture and that needs to be taken into account long-term.
Please note that we are going to put the whole WordPress installation on EFS which does have some latency and performance concerns. We will try to overcome this with caching and CDN; however, if that’s not performant enough for your use case, you may want to only put the “uploads” directory on EFS and then have a process to update the base AMI going forward.
Prerequisite: AWS Reference Architecture and Previous Posts
As mentioned above, please ensure that you check out the AWS Reference architecture as well as our previous posts.
Additionally, you’ll need to have an AMI Ready to use for this post.
Create an ELB (Elastic Load Balancer)
The first step is to ensure that we have an AWS Certificate created in our account. This will be tied to our ELB for secure communication. Check out our post here to see how to create a certificate.
Next, navigate to the EC2 Service and click on “Load Balancers” in the left sidebar and then on “Create Load Balancer”.
Since we are using this for WordPress, we will select the Application Load Balancer for HTTP and HTTPS traffic.

Give the ELB a friendly name and then make sure that it is “Internet-facing” as we want this to be public.
Additionally, click on “Add listener” and add in an HTTPS listener on port 443.

Next, select the VPC you created, and select the App/Web Tier Subnets AS WELL as the public subnets. With our set up, you will need a NAT instance that your Private EC2 instances connect to for this to all work properly. Or the work around is to deploy your web/app instances in the public subnet and have the ELB route to those instances.

Now click on “Configure Security Settings” in the bottom right. Select the certificate from ACM that you created earlier.
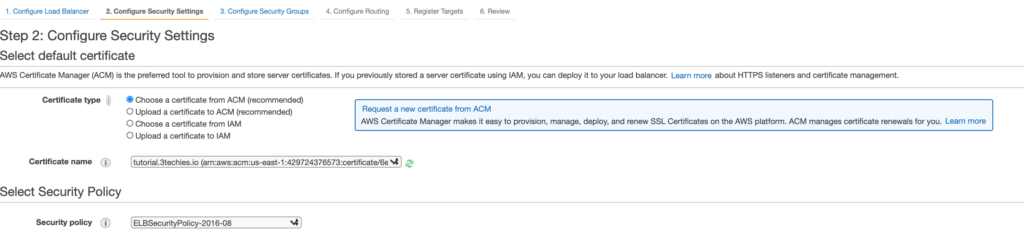
Next “Configure Security Groups” and select the Security Group we created for our ELB.

Next, we’ll have to tell the ELB what hosts will be in the backend so we need to create a Target Group.
Give this a friendly name and we can leave the protocol as HTTP on Port 80. Note that our clients will connect to the ELB with SSL; however, our ELB will communicate with the instances on our Private Subnets over HTTP on port 80.

We will leave the Target’s blank for now.

Hit “Create” and it’ll take just a few moments for things to be set up.
Next if you select your ELB and look at the details, you’ll see the DNS name record for your ELB.

In your DNS Provider, create a CNAME record that points to this “DNS name”.

Optional: Create a test instance
At this point, you can create a test instance and place it in the Target Group we created to test and make sure that the ELB is routing properly.
Create a Launch Configuration
What is an auto-scaling launch configuration?
As noted in the AWS Docs:
A launch configuration is a template that an EC2 Auto Scaling group uses to launch EC2 instances. When you create a launch configuration, you specify information for the instances such as the ID of the Amazon Machine Image (AMI), the instance type, a key pair, one or more security groups, and a block device mapping. If you’ve launched an EC2 instance before, you specified the same information in order to launch the instance. When you create an EC2 Auto Scaling group, you must specify a launch configuration
https://aws.amazon.com/ec2/autoscaling/faqs/
Navigate to “Launch Configurations” under “Auto Scaling” in the EC2 Service and then click on “Create launch configuration”.

Give your Launch Configuration a friendly name, I like to use a name similar to my AMI naming convention.
Select the AMI we created earlier, and the instance type that you’d like to use.

Scroll down to the “Security Groups” section and use existing groups. Select your NAT Security Group as well as the one we created for Web/App Server. You may have to scroll through to see all the Security Groups you need.


Select your existing Key Pair and then click on “Create launch configuration”.

It takes just a few seconds to create and you’ll be all set.

Create an Auto-Scaling Group
Navigate to “Auto Scaling Groups” under the EC2 Service and create a new group. Give the Auto Scaling Group a friendly name and select the Launch Configuration that we just created. Then click on Next.

Next select the VPC we created, and the subnets for our Web/App Servers. Then hit “Next”.

Now select our existing Elastic Load Balancer with our already created Target Group.

Next configure the minimum number of instances you’d like, and the max.

Next create a scaling policy. For our example, we’ll use the CPU Utilization metric so if CPU on any of our web servers goes beyond 40% for a period of time, our ASG will add additional instances to bring the utilization back down to the value we set.

Add notifications if you’d like be be informed of instance creation/termination.

Add any tags you’d like and then Review and Create.

Once created, you’ll see the following:

Wait just a few more moments and the magic will start to happen. Since we specified a minimum of 1, and we currently have no instances, the ASG will begin spinning up an EC2 instance using our Launch Configuration.
We can see that the last instance in our Dashboard was just created:

Additionally, if we click on the instance and then look at the “Tags”, we’ll see that it was created by our Auto Scaling Group!

We will also see that it was added to our Target Group for the Elastic Load Balancer. It may show as unhealthy as the instance comes online, but we should be fine after a few minutes.


Once healthy, if you now point your browser to your site, you should see your brand new Auto-Scaling WordPress installation on AWS!!!!

Test Auto-Scaling with Stress Test
We have a fully functional WordPress site that is on AWS and can scale up and down…but can it really? Let’s test it out on the one instance that we currently have running. We have our Auto Scaling Group based on CPU consumption on the instance.
Install Stress on Ubuntu
We will install an application called stress on our server. Login to your WordPress instance via your Bastion Host and SSH Agent. Switch to the root user via “sudo -s” and run the following command to install Stress.
apt-get install stress
Now I recommend opening up another terminal and running “htop” which will let you view CPU consumption in real time.
htop
Go back to your main terminal and run the following to initiate CPU load on the server and test if our infrastructure scales up and in.
stress --cpu 1 --timeout 360
In the tab where you have htop running, you should immediately see CPU jump to 100%. Since this is a 1 core instance, the stress parameter of –cpu 1 is more than enough to peg the server.

After some time, you’ll see the Alarm in your CloudWatch Dashboard.

You’ll then see your Auto Scaling Group start to create another instance.

In this case, the Auto Scaling Group actually started spinning up two instances.

After 360 seconds, the stress test stopped and CPU on the first instance dropped back down. We should now see the group scale in.


During this time, I was also browsing the test site and the response was very quick.
The scale in policy is more conservative as AWS takes precedence with regards to availability; however, we see that the group scaled down after some time where the CPU utilization was less than our threshold.


Performance
This is clearly a test site, with only 1 viewer (me) at this point in time. Also, this is a site with text only at this point in time, so I was curious as to how GTMetrix would score the site.

I then imported our main site into the test site and wanted to see the performance there as well, not too bad, but again we don’t have a lot of traffic going to our test site.

Series Complete: Highly Available Auto-Scaling WordPress on AWS
You now have a fully scalable WordPress site able to handle spikes in traffic as well as your low volume times. Keep in mind that this series provided you with the foundational knowledge to set up a Highly Available Auto-Scaling WordPress infrastructure on AWS. There is a lot more to dig into with regard to security, and setting up the infrastructure to be even more hardened and resilient.
Some topics to consider:
- CI/CD and Updating/Upgrading your server is more complicated. If you need to update the server, OpenLiteSpeed, PHP, etc, a brand new AMI needs to be created, along with a new Launch Configuration and Auto Scaling Group
- There is a trade off between a performant site vs a highly available site. If you want both, it can be costly. For example, you could add “dummy” data to your EFS mount to get to the next tier of higher IOPS…
- Determine if you truly need a highly available scalable WordPress site. For a small blog/site, it can be easier to scale vertically before horizontally.
- Along the same lines, do you want to manage the infrastructure yourself? There are reputable WordPress hosting providers out there that can take the guesswork out of managing WordPress.
- Backup practices for your site
- Web site security/AWS Web Application Firewall
- This series assumes you are standing up a brand new server, migrating/importing an existing site has more items to consider
- Auto Scaling can be more complicated
- Other CloudWatch metrics may fit your use case better
- Your use case may have different stress testing needs
- We used the Free Tier resources through this tutorial, you’ll need to assess your use case to determine database size, cache cluster size, EC2 instance size, etc.
[/et_pb_text][/et_pb_column][/et_pb_row][/et_pb_section]